Tagged: tools
Update: Tesseract OCR in 2016
Using Tesseract via Command Line has consistently been the most wildly popular post on Digital Aladore. However, due to some changes, I thought I should update the information.
Tesseract used to be hosted at Google Code, which closed up shop in August 2015. The project has transitioned to Github, with the main page at https://github.com/tesseract-ocr/tesseract
and the Wiki page at: https://github.com/tesseract-ocr/tesseract/wiki
There is no longer an official Windows installer for the current release. If you want to use an installer, the old version on Google Code from 2012 still works, featuring Tesseract version 3.02.02 (I am not sure if this link will go away when Google Code moves to archive status in January 2016). This package is handy for English users since it will install everything you need in one go. (Update 2016-01-30: the link did go away in January, so there is no longer access to the old Google Code pages. It is easiest to use one of the installers listed below. If you want to compile it yourself, check out the directions from bantilan.)
If you want a more up-to-date version on Windows there are some third party installers put together for you, otherwise you have to compile it yourself (unless you use Cygwin or MSYS2):
- A nice portable install of both engine and language data from a guy named Simon
- A bleeding edge installer from Mannheim University Library
It is important to note that the OCR engine and language data are now completely separate. Install the Tesseract engine first, then unzip the language data into the “tessdata” directory.
On Linux installation is easier. Use your distro’s software repository (the package is usually called ‘tesseract-ocr’), or download the latest release and use make.
Now that you have it installed, the commands on the old post should work fine!
News at Sigil Ebook
Since Digital Aladore is more than a year old (see The Idea), I thought I should check in with a few of the key tools for any news. First up is Sigil Ebook editor, used for creating the various EPUB versions. As I have said many times, it is a great tool! There are a few features like the character report and auto merging html that I wish were in my everyday text editor.
After a scary period where it looked like development on Sigil might stall, I am happy to see it surge back to an active project full of interesting changes. This week version 0.9.1 was released stabilizing a host of new features moving the application towards full EPUB3 support. Also be sure to check through the Plugin Index to find many useful extensions for the editor.
Creating an editor that supports both EPUB2 and 3 is a bit complicated. As I mentioned in an earlier post, older versions of Sigil automatically correct markup and packaging to match the EPUB2 standard. To fix this issue, version 0.9.1 replaces Xerces (xml parser) and Tidy (html parser) with Python lxml and Google Gumbo, and makes the FlightCrew EPUB2 validator a plugin rather than built in tool.
Despite the major overhaul under the hood, using Sigil remains almost unchanged, which is great. So thank you to current maintainers Kevin Hendricks and Doug Massay and everyone else who makes this Free and open tool available!
Check out the code or get the latest version at Github.
Validated!
After completing the tweaks outlined in the last few posts, I opened the Aladore epub with Calibre’s built in editor for a final look. As mentioned in previous posts, the editor is comparable to Sigil, although not necessarily designed for creating ebooks from scratch. However, because it is built into Calibre’s ebook library management platform, it is great for making tweaks on the fly for testing on your reading devices. Also, development on the project currently seems more active than Sigil.
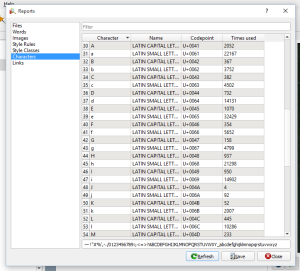
To get a overview of the contents of the epub, I open Reports from the Tools menu. This analyzes the package, listing all the files, words, images, styles, characters, and links. It is a nice way to quickly look for any issues that might still be lurking. I scan through the words to see if any weirdness stands out, then check the characters to ensure there is nothing strange. You will learn interest factoids, such as “and” is the most used word at 4001 times, or there is 66,910 spaces in the ebook.
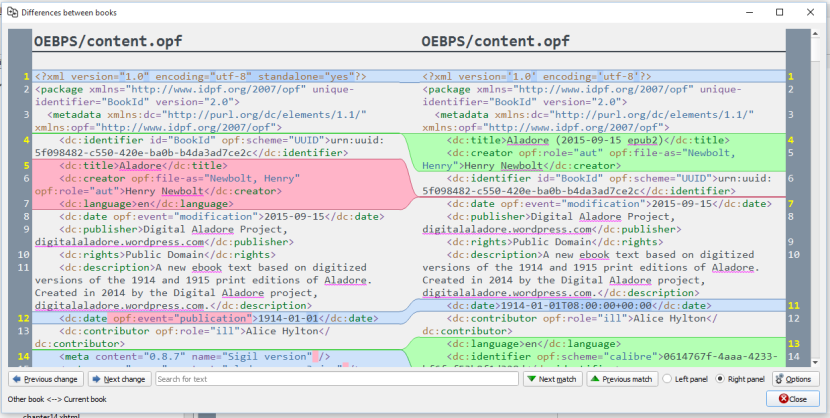
 It is worth noting that Calibre slightly modifies the metadata when ebooks are added to the library. If you are anal about your newly perfected markup, you might want to re-edit it. One powerful feature of the editor is “Compare to another book” under the File menu. It creates a nice visualization highlighting the differences between versions of the ebook (compare with Juxta used earlier in Digital Aladore). Here it is showing the differences introduced by the automatic Calibre metadata edits:
So everything looks okay! I also flipped through it on my reader for a final “user testing” session.
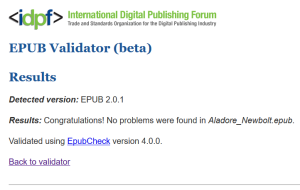
Finally, we want to run it though IDPF’s EPUB Validator (a free web-based tool) to ensure everything is kosher:
Ready for distribution?
Free eBook Creation Machine
So you have your new junk computer ready, now you need some ebook creation software!
This post provides a list of the tools used in the final EPUB creation workflow at Digital Aladore. If you are running one of the major Linux Distributions (such as Ubuntu) the easiest way to find/install most of these applications is via the Software Center. However, it is worth checking the version number, since the ones available are often a few up-dates behind.
DownThemAll! this is the download manager/batcher that helps you harvest images of public domain books to OCR. It is an extension for Firefox, so it is easiest to get by visiting the Add-ons menu in the browser or http://www.downthemall.net
ScanTailor, this handy tool created by the DYI book scanner community will help batch preprocess the image files for your book. Get it in the Software Center or from http://scantailor.org
Tesseract-OCR, you need to install this OCR engine for, well OCR… It can be used via command line or with a seporately installed GUI. Mysteriously, it is listed as “Command line OCR tool” in the Ubuntu Software Center. Or get it from https://code.google.com/p/tesseract-ocr
YAGF, very simple OCR GUI with Tesseract to export HTML text. It can be found in Software Centers, but is usually out-of-date compared to the version on the website, http://sourceforge.net/projects/yagf-ocr
BlueFish, handy HTML text editor with powerful batch tools, get it from Software Center or http://bluefish.openoffice.nl/download.html
GIMP, image editor for fixing up the illustrations, available at most Software Centers or http://www.gimp.org
Sigil, full featured EPUB editing tool, get the latest version here https://github.com/user-none/Sigil/releases
Calibre, very handy ebook management and editing tool, http://calibre-ebook.com
That’s the essential list! More than everything you need to create an ebook, but if you need more, check out the Digital Aladore tools bibliography.
Aladore Regex
In earlier posts, I mentioned using advanced features of find & replace to do some automated editing of the HTML tags in the text. Let me give you another example to show how useful some clever find & replace can be!
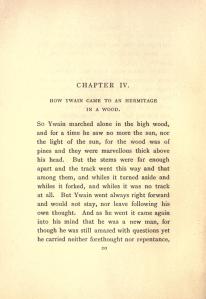
Before uploading the draft Aladore EPUB, I wanted to quickly edit the format of the chapter titles. At this point the chapter headings looked like this:
<p>CHAPTER IV.</p>
<p>HOW YWAIN CAME TO AN HERMITAGE IN A WOOD.</p>
They look exactly the same as normal body paragraphs. Of course, in the print version this is not the case.
To better match the look of the print book, I decided the headings should be centered and tagged h2. This will more clearly set them off from the body text, something like this:
<h2 style="text-align: center;">CHAPTER IV.</h2>
<h2 style="text-align: center;">HOW YWAIN CAME TO AN HERMITAGE IN A WOOD.</h2>
However, I also wanted to quickly generate a table of contents. If I tagged the heading as shown above, the automatically generated TOC would have two separate entries for each chapter. So a quick and dirty alternative is to put a <br /> between the two parts of the chapter title, making them a single h2 unit that will appear correctly in the TOC. This solution looks like:
<h2 style="text-align: center;">CHAPTER IV.<br />HOW YWAIN CAME TO AN HERMITAGE IN A WOOD.</h2>
So, how can we automatically find the 58 chapter headings and get them tagged correctly without doing it by hand? Luckily, Sigil supports Find & Replace with Regular Expressions (i.e. Regex, make sure you have regex chosen for the Mode in the find window). With a few handy expressions and some logical thinking, we can sort this out in no time. If you want to learn about and practice Regex, check out RegExr.
The main things we need to work with for this application are the lookahead and lookbehind expressions. In this case it is very easy to test the accuracy of the expression–click Count All and it should be exactly 58 items, otherwise you are not catching only/all the chapter headings.
First, I need to replace the <p> in front of the title “CHAPTER…” with <h2 style=”text-align: center;”>. To do this, use a lookahead, (?=ABC). This means we are using “CHAPTER” in our search, but will not select it for the Replace function. The Find looks like this:
<p>(?=CHAPTER)
It will find and select only the <p> that appear before “CHAPTER”, but it does not select CHAPTER. Awesome!
Next, I want to find the p tags between the two sections of the chapter heading and replace them with <br />. Since the roman numerals that follow CHAPTER make it a variable string length, for technical reasons we can not use a lookbehind. Instead we need to figure out a regex that will find only the chapter subtitle (for example, HOW YWAIN CAME TO AN HERMITAGE IN A WOOD.) to use in another lookahead. Every chapter subtitle is in all uppercase and at least 20 characters–AND there is no other string in the book that has those qualities. We can use these facts to create our find string: [A-Z,\s,’]{20,}. This expression means find any string that includes ONLY the uppercase letters A through Z, \s white spaces, or ‘ (needs to be included since some titles have possessives) AND that is 20 characters or more in length. I didn’t do any serious analysis to decide on the number 20–I just looked a few of the subtitles, counted the number of characters, and tested a few numbers by entering the expression and clicking Count All. If I got 58 results, I knew I was on the right track. The expression will find only our chapter subtitles, so we can use it in a lookahead to select the two p tags between the chapter number and the subtitle. The find looks like this:
</p>
<p>(?=[A-Z,\s,']{20,})
It will select only the two p tags, which I replace with a break.
Finally, we need to replace the </p> after the chapter subtitle with a <h2>. This time we need to use a lookbehind (?<=ABC), because there is no consistent string after the subtitle that we can use in searching. In a lookbehind, we can not use a string of open length as I did above. However, the same qualities of the subtitle will give us enough information to create a distinctive search that will exclude everything NOT a subtitle. In this case, a string of three characters, including only uppercase letters and a period [A-Z,.]{3} in front of a </p> will give us the 58 results we want. This is because no other paragraph in the book ends with a word in uppercase letters. The lookbehind Find expression looks like this:
(?<=[A-Z,.]{3})</p>
It selects only the </p> tag, which I replace with </h2> to close off the heading. Now, we have all the chapter titles tagged correctly and looking… well, sort of beautiful. When we get into more polishing, we will use similar expressions to add the style tags needed for CSS.
Isn’t it amazing that we have gone from textual transmission to Regex? Ha, ha, I love Digital Aladore!
Free Machine: OS
Now that you have a clean hard drive, its time to add an operating system!
Most home computers run Windows or Mac OS which are developed, owned, and controlled by single corporations. Linux is different–an Open operating system that is developed by thousands of contributors world wide (check out the Linux Foundation). The kernel (the layer of software that directly communicates with hardware, the core of an OS) was written by Finnish computer scientist Linus Torvalds and released in 1991. The kernel is now distributed under a GPLv2 license. Although Linux is not common on home computers, it is EVERYWHERE! Linux powers the majority of servers that host the internet, main frame computers, and mobile devices. For example, Android which now runs on more than a billion devices, is built on Linux.
For home computers there are hundreds of Linux “flavors” available, called distributions or distros (for example see the Wikipedia list or DistroWatch). Each distro is a group of applications, utilities, and a desktop environment bundled with a Linux kernel. There is a huge variety in the look, functionality, performance, and guiding philosophy as each distro is customized to particular users and needs.
So lets get a open OS running on your recycled ebook creation machine!
[remember, follow these posts at your own risk!]
1. So the first step is to choose a distribution. This can be complicated and overwhelming!
But lets make it simple: for my junk computers I like to use Ubuntu. It is one of the most popular, actively developed, and well supported distributions today. Some Linux purists like to dismiss Ubuntu as too main stream or something, but for the purposes of reviving junk computers I think it is the best. It is simple to install, has very wide hardware compatibility, and is very easy to use. People with no previous Linux experience will have no trouble figuring it out.
Once you get your feet wet, maybe you will want to move on to another distribution, but for shear simplicity and success working with old computers, just go with Ubuntu or one of its derivatives.
2. The second step is to create a bootable DVD or USB stick:
Go to the Ubuntu (or other distro) site and download the desktop ISO. If your hardware is has low specs, you may want to try a distro with a lighter desktop environment, such as Xubuntu or Lubuntu. The ISO will need to be burnt to a DVD or used to create a live USB stick. I prefer to use the USB stick, since it doesn’t waste plastic or add cost!
I mentioned how to burn a ISO to CD/DVD in the last post–its simple.
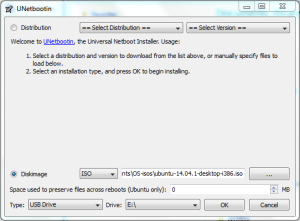
It is also fairly simple to create a bootable USB stick. Download one of the live USB creation tools (here is a big list on Wikipedia), such as UNetbootin, http://unetbootin.github.io/
Start the application, select the downloaded ISO and the correct USB drive, and click OK:
Everything on the USB stick will be erased. The burn may take a few minutes and the ISO will be added with special files to make it bootable.
Eject the new USB stick, and plug it into your junk computer. You should also set up the computer at this time, plugging in a monitor, keyboard, mouse, and ethernet cable (you can use wireless, but its usually easier to use ethernet).
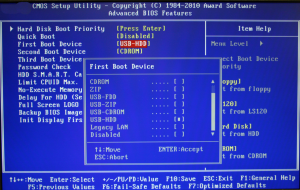
Now, (if you haven’t already) we need to make sure the junk computer will boot from USB. This means opening BIOS options as the computer powers on. Each device is slightly different, but as the computer starts to boot you should see a screen with the manufacture’s logo and a message that tells you which key to press–sometimes its so fast you can’t read it! The key is usually F1, F2, DEL, ESC, or F10 (here are some tips from Pendrivelinux). It will open a configuration GUI that looks something like this:
Make sure that USB is listed as the first boot device.
But, what if your old computer BIOS doesn’t support booting from USB? Well, you can use a DVD. But, what if the machine only has a CD drive (or you don’t want to burn a DVD)? Here is one work around solution to boot from USB sticks on machines that don’t normally support it: use Plop Boot Manager, http://www.plop.at/en/bootmanager
Plop is a handy and powerful tool that can do many things, but for this purpose, burn the live CD version. The computer will boot from the CD, loading Plop. Plop will then offer you the choice to boot from USB!
3. The third step is to actually install the OS.
The live DVD or USB stick will load the installation program. Ubuntu makes it very easy, just read the information on screen and follow the instructions (here is their guide).
Okay you’re done! You have a new (old junk) computer!
One final note, to restore your USB stick to its natural state, you will need to reformat it. Most OS have built in tools to do this, but better results are possible with the official SD Formatter, https://www.sdcard.org/downloads/formatter_4
This will erase the weirdness UNetbootin added to make the stick bootable, and restore the USB stick to its default state.
Good luck and enjoy!
Free Machine: hard drive nuke!
At this point I should point out that these posts are not very detailed or authoritative (this is not the main mission of Digital Aladore)–use my suggestions at your own risk! Luckily, if you are following along, you have junk hardware, so there is very little risk. If you need more information about any point, make a very specific search–there is an incredible amount of information available, often targeted to specific computer models. It is also worth searching YouTube as there is an endless number of video tutorials that may help you along the way. If you have encountered a problem, its almost guaranteed that a bunch of other people have too!
Now that you cleaned out all the dust from your junk computer, its time to clean up the data.
When you delete files inside your OS, the data does not actually go away–it basically just removes the references to the location. This means it is fairly easy to recover the contents of a drive even if everything was deleted. So when you are getting rid of a computer, it is a good idea to securely erase the hard drive. For truly sensitive data, the most secure method of erasure is to physically destroy the drive. Of course, for the average person, this is a waste of money and environmentally unfriendly. Instead, there are a few applications that systematically over-write the entire storage space of the hard drive with random numbers, thus achieving more complete and secure erasure of your data, without destroying the drive.
So if you want to re-use a hard drive (or give away your own computer), I would suggest first completing a full erasure since too many people forget to do it. If some one is nice enough to give you a free machine, its the polite and ethical thing to do! Furthermore, it will give you a fresh clean drive to work with, the equivalent of getting rid of the physical dust and grime. The best way to do this is via a bootable application running from a CD or USB stick. The most commonly used is “Darik’s Boot and Nuke”, know as DBAN.
DBAN, http://www.dban.org
[or on Source Forge http://sourceforge.net/projects/dban]
DBAN was an open source project, but was acquired by a commercial developer in 2012. It is still free and licensed GPLv2, but the website is half advertizement for a more advanced commercial application. Just ignore the ad and download DBAN.
You will get an ISO file which is a optical disk image. This is the most common way to distribute the data to create bootable CDs, DVDs, or USB sticks. ISOs cannot just be copied to a CD or USB, but need to be properly written to the storage.
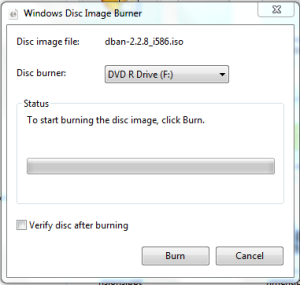
Creating a bootable CD is simple in Windows 7 or higher. Simply insert a blank disc into your burner, then right click on the ISO file and choose Open With > Windows Disc Image Burner. Click Burn! (For other OS there are many simple applications that can burn disc images, you probably have one already installed)
Once the disc is burnt, LABEL it with some dire warnings–Warning: DBAN NUKE! You don’t want to accidentally run this one…
You can also create a bootable USB stick, using a tool such as UNetbootin or Universal USB Installer. This is helpful if your junk computer does not have a working CD drive. However, the one disadvantage is that using the autonuke feature of DBAN will result in also nuking the USB drive unless you remember to remove it before the nuking process begins.
Using DBAN is fairly simple: start up your junk computer, open the CD drive, insert DBAN, then restart. There is a very simplistic text based interface with a few options. Please read other tutorials to find out all the details (for example try ultimate boot cd) and remember this is powerful–everything will be GONE. The easiest/best option is to just type “autonuke” and let DBAN go to work. Everything will be nuked. It will take a long time, maybe three hours… When it is done, DBAN will display a completion message. Simply remove the CD and shut down the computer. You now have an empty hard drive!
One final note:
If you don’t have large storage needs you can just avoid the hard drive altogether by using USB sticks for both OS and storage. This is a more reliable option since hard drives have a relatively short life span (you should only expect a hard drive to last around five years max). In general, solid state memory is more reliable and also likely newer than the traditional hard drive found in your old machine.
Still Working on Aladore!
Okay, so despite the lack of Aladore related posts for awhile, Digital Aladore is still working on the final EPUB!
I just decided to take some more time to think about the final formatting and polish. However, lets say you are really, really dieing to read my new text, you could go read it where I posted it on Juxta… just kidding, here is a downloadable plain text version, saved in ODT (WordPress doesn’t let me post txt, sorry for the silly work around):
Or if you prefer, here is a very basic HTML version, again saved in ODT:
I offer these unformatted versions in case you want to do something with the plain text, like use it for textual analysis or something else fun! For example you could:
Do some text analysis with TAPoR ware, http://taporware.ualberta.ca/~taporware/textTools
Explore the text with visualizations at Voyant, http://voyant-tools.org
Or try out some serious visual analytics using Jigsaw, http://www.cc.gatech.edu/gvu/ii/jigsaw
(They are all free!)
Let me know if you come up with something interesting!
Another Juxta use!
After creating my best text combining my OCR transcripts of Aladore 1914 and 1915 editions, I realized I had a “newer” version of the 1914 text that I didn’t use! When creating the draft Aladore EPUB using the 1914 text, I spent some time correcting the paragraph breaks since they are not very accurate in the OCR text. The version I used for the Juxta collations did not include these corrections…
No big deal–I just put the text I created with Juxta in the last post back into Juxta as a witness and collated it with the forgotten 1914 version. Then I could scroll through to quickly add edits to the best text. Done.
Basically I was combining the edits of the two texts, kind of amazing idea when you think about it, since they happened asynchronously with different source texts. Juxta is useful as a versioning tool–I am sure there are some others available aimed at coders. But Juxta is free and simple to use. I suggest the desktop version unless you want to share online. Also, if you have a wordpress site, there is a plugin to embed Juxta collations.
Using Juxta
So the collation of the 1914 and 1915 Aladore texts is pretty neat–but it is also useful. I don’t think it is revealing any interesting differences between the two printed editions, but it is surfacing many simple errors in the OCR that I haven’t spotted by other means. The 1914 and 1915 print editions seem to be identical except for a few page breaks. I do not need to unravel issues with the transmission or make any complex editorial decisions based on textual scholarship. Instead, the comparison is part of a process to get the new OCR witnesses to better match the digital image witnesses. The OCR of each edition has slightly different errors which are highlighted by the collation. Thus, by combining the information of two imperfect witnesses (all witnesses are imperfect!), we can create a new best text that is more accurate than its parents.
Here is an example:
The 1915 has “world’s. four roads” and the 1914 “world’s {our roads”, so both have errors! Looking at the page images “world’s four roads” is obviously the correct reading, but the 1915 edition has a tiny blemish at the end of a line which OCRed as a period, and the “f” of four in 1914 edition is slightly faint contributing to its missed identification. These are exactly the sort of OCR errors that are hard to detect in any other way since they do not show up when spell checking and are not visually obvious.
In case you want to play along, I shared the comparison on Juxta Commons: http://juxtacommons.org/shares/qWLf2p
However, Juxta Commons is not ideal for actually fixing the errors, since it does not allow you to edit the source texts. You will have to open the base text in an external text editor to fix issues as you look through the collation on Juxta. Instead, I prefer to use the desktop version which does allow you to edit on the fly–handy! One other difference is that the desktop application displays the raw HTML rather than the rendered text shown on the Commons. This can be distracting if your tags are too ugly but I like seeing them since I want to ensure both the text content and tags are correct.
Here is my workflow for the process:
1) Download and install the desktop version of Juxta from http://www.juxtasoftware.org/download
2) Open Juxta, and click File > New Comparison Set.
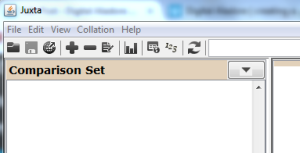
3) Click the Plus icon to add your witnesses (i.e. Digital Aladore 1914 and 1915).
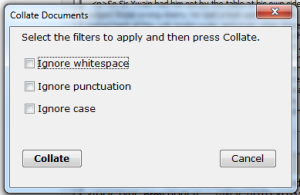
4) Click the Refresh icon to collate the witnesses. This brings up a dialog box with options for the collation. Since I want to detect ALL differences, I uncheck all the boxes. Processing might take a few seconds.
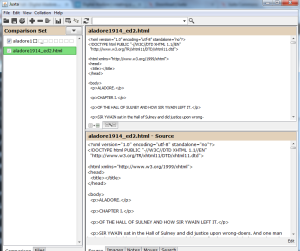
You will now have a workspace something like this:
Clicking on a witness listed on the “Comparison Set” pane (left) changes the base text. The selected base text will appear in the lower right “Source” pane. The upper right pane can be switched between “Collation view” or “Comparison view” (i.e. Heatmap or Side-by-side in Juxta Commons terminology, as described in the previous post) using the tabs on the bottom of the pane. Clicking on a word in Collation pane will move the source text and highlight the selection in the Source pane.
5) Choose one of the source texts to edit (I used Aladore 1914). Then, click “Edit” in the lower right corner of the Source pane. This allows you to edit the text, but nothing is saved until you click “Update.”
6) Now, I scroll through the text on the Collation pane (I prefer to use the “Comparison view”) and decide which errors need to be edited in the base text. I click on the highlighted errors in the Collation pane (if using Comparison view, make sure you click on the side representing your base text or it will switch the Source pane). This brings up the corresponding spot in the Source pane to edit. If the correct reading is not obvious, I quickly check the original page image (I have the directory open with thumbnails and a preview window so they are easy to reference).
7) When finished working through the entire collation, click “Update” on the lower right corner of the Source pane and save the edited text with a new name.
8) Click on the new text in the Comparison Set pane. Then, click File > Export Source Document. This saves a text file of the new witness.
Done!
This little activity caught a lot more errors than I expected! In particular, the 1914 text had “b” instead of “h” in many places. There was also many misplaced periods in random locations. The interface is a little cumbersome for editing in this way, but I definitely think it is a useful tool.

